|
Growing Taro
March 12, 1997
Varieties that work great: Don't get too hung up on varieties just yet.
Almost any kind you find will work fine to get started. Almost all taro can grow in either of the two main methods: "dryland"
or "upland", in the dirt like any other vegetable; or "wetland", which is with the roots in the water. Almost all taro can
be used for any of the food uses, but some are better than others. I will tell you about the 3 varieties I have grown in buckets.
1. Bun-long, or Chinese, taro. This is the variety that is used for most of the taro leaf grown in Hawaii for
laulau, etc. It is also grown for its corm (root), which is not used for poi, but it is steamed with roast pork. It is the
only one used for taro chips.
The best thing about Bun-long is that it is the hardiest taro I know of. You just can't kill it. It grows great in either
dryland or wetland.
Bun-long taro is most easily recognized by its colorful corm. It has purple fibers that show against the whitish flesh
(you can see the purple marks in the chips). The leaf has a large purple piko (navel in the "center" of the leaf), and the
stem is green on the lower half, shading into purple at the top.
2. Kakakura ula ula. This variety has red (ula) stems.
It is one of the most ornamental taros I have ever seen. I got mine from Gloria, who grows leaf for one of the big laulau
people. She is gradually switching from Bun-long to this one because she thinks it has a tastier leaf (so do I) [edit - now
I am back to preferring bun long.]. (The tastiest leaf, though, is all 3 varieties mixed together.)
The best thing about Kakakura ula ula is the easy way that it replants. It sends out these long runners that make a little
plantlet on the end, kind of like a spider lily. You can just plant one of these, with out harvesting the mother plant. That
way, when you do harvest, that is all you have to do. With the others you tend to do harvest and replant at the same time.
If you had to pick just one variety to grow, this is a good one.
Kakakura taro is most easily recognized by the runners and the brilliant reddish-purple stems. There are also black
(ele ele) varieties that are fine.
3. Piialii. This one of the oldest taro varieties grown, and was known in the early
days of Hawaiian history as one of the royal taros. Commercially it makes a "red" poi (purple, not gray) that is highly prized.
The leaf is very tasty, my favorite if I had to choose.
The best thing about Piialii is the way it cooks in the oven. Most taros tend to be too dry in the mouth to just
bake and eat. Piialii bakes up almost as juicy as a good sweet potato. It looks great baked too, sort of purple instead of
white. It has a delicious flavor. It is so unusual you can serve it as a pupu or even as a desert.
However, Piialii is
one of the trickiest to grow. It seems to like colder water for its roots (use a bigger water container and shade it) and
sometimes it gets more aphids and scales (grow it on a table so you can keep the ants off). It can look kind of beat up.
Piialii is most easily recognized by its leaves, which make a cup. The leaves remind me of an upside down umbrella,
sort of crinkled. There are other varieties with cup leaves. Of these, Piialii is the only one with the purple coloration
in the roots. The inner skin of the corm is red, and the stem just above the roots is a pretty lilac color once you start
peeling the old leaves away. When you cut the stems, a blood red liquid oozes out.
Bucket lo'i method: This is
a very easy way to grow taro at home.
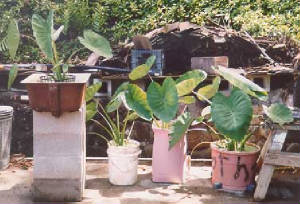
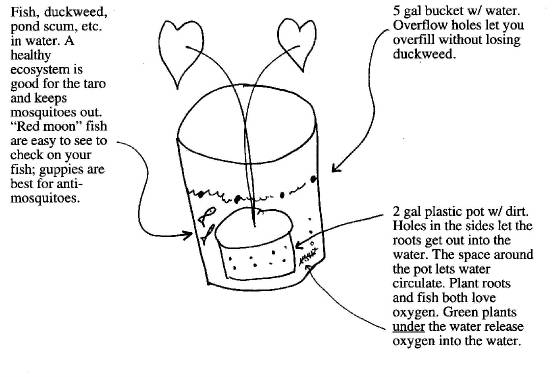
The planting set up - a bucket and pot: Anything that holds
water will do for the bucket. It just needs to be bigger than the pot, which holds the dirt. The smallest set up I have used
is a gallon milk jug for the bucket and a yogurt cup for the pot. The biggest set up I have used is an old furo (deep bath
tub) with 2 ~5 gallon buckets for the pots. The bigger the better, of course. A good, easy-to-get set up is a 5 gallon bucket
for the bucket and a 2 gallon plastic pot for the pot.
Dirt: I try to use fresh dirt each time. The smaller
your pot is, the easier this is. If I don't use fresh dirt (like if my pot is 5 gal of dirt), I let the pot "go fallow" -
wait a few weeks in between harvesting and replanting. Plain dirt is probably just fine, but I usually go deluxe and mix in
a little lime (or beach sand, or best, "Soil Sweet") (about a cup per gallon), a little "Soil Buster" (about a tablespoon),
and a little 10-30-10 (about a tablespoon per gallon) and trace elements (a dash in the 10-30-10).
Fertilizer: I use either 10-20-20 or 16-16-16 early
on, mixed with a little trace elements and lime. I use about a teaspoon per pot per week once the plants start really growing.
You can just throw it in the water, but it is probably better to bury it in the dirt. If you give too little fertilizer you'll
see the oldest leaves yellow all over and die before they normally would (nitrogen deficiency). Later, if you want corms,
use 10-20-20, then nothing. Too much fertilizer, especially nitrogen, makes the plant grow leaves and not go dormant (produce
a corm). The pros at UH say use only 10-20-20 (not the 16-16-16), and don't give any fertilizer of any kind past about 6 months.
[Edit - now I more than agree - tastes best with only fert at beginning.]
Water: Top it up once a week or so. It doesn't
seem to hurt anything to let the water level get pretty low, but it also doesn't hurt to top it up every day. Extra water,
higher than the overflow holes, flushes out and freshens the water, like in a real lo'i with water flowing in and out constantly.
Excess salt (usually excess fertilizer) shows on taro leaves as dead spots along the edges. This means you need to be flushing
more (or fertilizing less).
Normal life cycle of a taro plant: During the first
month after setting out the leaf growth is slow, as the roots are growing. The next 3 months are the most fun to watch, with
awesome leafy growth. In bigger pots the leaves will be over 2 feet long. Sometime around the 4th to 6th month the plant will
peak in size (especially if it is rootbound in a small container). Then the leaves start transferring carbohydrate into the
corms. From this peak until maturity each new leaf is smaller. The larger, older leaves will fade away, leaving a smaller
plant with a big root bulb. The plant is mature in about 9 to 12 months in a normal field. This transition from dynamite growth
to dormancy is still tricky for me. You need to master it (or get lucky) to get a good sized corm. Cutting back on fertilizer
and water are important, but I don't know exactly what the recipe is. (Small plants & corms taste just as good.)
Harvest: Traditionally, farmers either grow for
leaf or corm. I have had a few lucky shots when I got both, but after a few flops (taste-wise) I am going back to tradition.
To get both try to harvest just after the plant peaks in size. At this stage there will be lots of leaves, and if you use
just the younger ones they will be fine. There will also be some almost full flavored corm. There is a sort of nutty flavor
that corms start getting at about 4 months. Before this the flavor is fine but more veggie flavored. The leaves are best when
younger, and once they get too old, even though still green, they aren't very good. What I do now is grow some plants for
corms and some for leaves. The harvest is different.
For harvesting the corm plants, I let them peak,
and then I pick them any time I need them. When you harvest the first time, don't be shocked if you don't see a big corm.
What I call success is to get any ripe corm that tastes great. The worst thing I have done is let the plant fester too long
before harvesting. In a place we call "the swamp", not in the pot system here, if I let the corm go too long, more than about
6 months, it tends to be overly mature and start on a new corm above it. Then the corm looks like an hour glass. The old corm
on the bottom goes back into leaves and then tastes rotten. (I think this going-back-to-veggie is from too much nitrogen.
When I use 10-20-20 it doesn't happen.)
To harvest, wear rubber gloves if you have them.
(If the plant is huge, it may be easier to harvest the leaves first to reduce the mass for the next steps. Cut off all the
leaves, then cut off the old leaves and throw away, then harvest the youngest 2-4 leaves. See below for leaves.) To get the
corm, just drag the plant and pot out of the bucket, and take it to some place where you have a hose and can wash excess dirt
into some ground cover or something. Cut off the roots and wash the dirt off until the corm is clean enough to take into your
kitchen. By this stage you should have up with 3 "products" for the kitchen: clean corms, huli, and leaves. You'll also get
something to replant, which we might as well cover now.
To get new starter for your next crop, the keiki
("oha") are fine as planting material, but traditionally the top of the parent plant (the "huli") is used. I think in the
long run (like eons) planting huli selects for bigger corms, whereas planting oha probably leads toward keiki-itis, but that
is not a big issue for us backyard guys. There is a trade-off: the huli is a tasty addition to the meal. (A planting huli
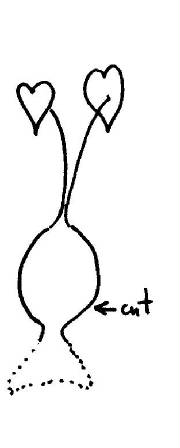
is made by cutting the corm, leaving the top 1/2 inch, and cutting the leaves off just past the groove in the stems, leaving
about a foot above the corm.) Whichever you use, the modern way is to dip the oha or huli in "huli dip", which is bleach plus
water (a 10% solution, 1.5 cups bleach in a gallon water). Soak about a minute or less, and set aside to dry for a few days.
I've had good luck with not dipping, but I usually do use dip. My method is a little different. I keep a small bottle of huli
dip handy. I slosh a little dip only on the major cut wounds on the roots, then I wrap each huli or keiki separately in newspaper
and leave in my garage until the next day to plant. I use fresh (non-taro) dirt to replant. (If you're going to replant back
into taro dirt, a good trick is to plant first in a small pot of fresh dirt, grow for a few weeks "dryland", watered with
a hose, then transplant to the taro dirt. This helps prevent rot diseases 2 ways. It lets the wounds heal in a germ free area,
and it lets the old taro dirt/water go fallow and all the germs get eaten up.)
Harvesting the leaf plants is a little different.
Usually these are smaller, younger plants with just a little root. If you don't handle the root too much, you can get away
with not wearing gloves. I take my cooking pot right out to the plants, and use an old knife I just leave by the taro. Take
a good sized plant, and with the knife sort of cut around where you think the main roots are. Then, with a hose running to
rinse both the plant and the knife frequently, cut the older outside leaves off and throw them away. If you cut towards the
root, it is easier to phase into peeling the root. Don't "economize". If you think a part of the root is too old, or has some
kind of "infection" (the fibers may be brownish), whack it off. When the root is peeled, slice it like a carrot into the cooking
pot. As you get up close to the leaves, you can take the leaves off one by one. Rinse very well after each leaf. I only use
the youngest 3 or 4 leaves. I cut the tip of each leaf off, because I read in an old taro book that makes the leaves taste
better. Cut off any damaged leaf parts. Now cut a little more of the "carrot" off, but not too much. As soon as you can take
the next leaf off, do, and rinse again. There is some "swampy" stuff between the leaves and the plant. Continue until the
last leaf will not come off. Chop up the core and the good leaves and their stems.
If you want to harvest leaves continuously, without
harvesting any of the root, that works OK for a while. If you cut each leaf before it gets more than a week or two old, it
will taste great. Sometimes I cut virtually every leaf off a plant, including its oha, and they come back fine. But mostly
I leave 2 leaves behind - the one that is growing in the center and the one it came out of. The rest I cut. (If I haven't
cut for a few weeks I throw away any leaves more than about 4 away from the center. Also, I assume a plant likes to have its
leaves in "order", so I don't cut out the young ones and leave the old ones.) When you cut leaves, cut as low as you can without
going under the water (I assume that could cause infection), so you get a nice long stem.
The main problem with these continuous-cut leaf
plants is that in about 6 months or so they get old and root bound. At this stage I have had fair luck with starting to cut
out the biggest of the corms, with their leaves, and treating them as whole leaf plants as above. When you cut a big corm
out of a rootbound mass, you can't help but wound some of the plants left behind. It seems like you're begging for infections,
but it's been OK. Once I get the mass cut down to 1 or 2 plants, I leave it alone for awhile, as if it had just been replanted.
Cooking Taro
These first 3 recipes call for a pressure cooker,
which gets hotter than regular boiling, and heat gets rid of the "itchiness" of taro. (If you bite into raw taro you'll regret
it.) However, people have told me they use these recipes in a regular pot, and they work just fine. The recipes have salt,
and I think salt is another key trick to getting rid of itchiness. Salt definitely works on your hands if they start itching.
(Leave the salt on for a few minutes. If you rinse it off right away, the itchiness comes right back.)
Whole plant huli style taro: 2 cups water and 1
3/4 tsp. salt in pressure cooker. (If you have mostly corms and few leaves, use less salt.)
Prepare taro parts and put in pressure cooker as
each is prepared:
Corms: (If plant was grown more than about 6 months
it may have overly mature corm. This has a very bad taste and should be cut off and thrown away. Any rotten spots should be
liberally cut away.) Peel and slice the corm fairly small, about 1/2" thick.
Stems and huli: slice up into bigger pieces. If
your cooking pot starts getting full, it's OK to mash the stems in. They shrink way down when cooked. (Don't mash on your
stove or you can break it.)
Leaves: Small leaves go in whole, big leaves chop
off the piko as if it were a stem, then chop leaf into slabs about 4" wide.
Close the pressure cooker, turn on enough heat
to get it jiggling in about 10 minutes (halfway between med and med high on my stove). Set timer for about 30 minutes. The
timing is not super critical, as long as it cooks enough. The key is probably how much jiggle time it gets (about 20 minutes)
but I don't do it that way. When the timer goes off, turn off heat and just let it sit there. I usually let it sit an hour
or more, but at least enough to safely open the pot.
Fake palusami: Basically the same as above, but
add a can of coconut milk and a few other items if you want to. Chopped onions are fine. A can of corned beef or Spam will
be loved by some. (You can also just cook these separately.) Cutup leftover BBQ chicken, or almost any meat, is great.
Good trick for leaves only: If you don't have time
to harvest corms, or they're not ready yet, just cut a quick bowl full of leaves and stems. Use salt, water, and coconut milk
as above, and white potatoes. The potatoes can be quartered on top of the leaves, filling the pressure cooker up.
Baked whole taro corms: I am still experimenting,
but having great luck with just baking for an hour at 450 degrees. The corm is peeled, and you can leave as much of the huli
on as you want to. The outside of the corm tends to dry out a little, but that is OK. Next I will try individually wrapping
in aluminum foil with ti leaf wrap inside of that. So far I have just laid a sheet of aluminum foil below and above a bunch
of corms on a cookie tray. Piialii is the only variety that is really good this way. The other ones are better cooked in the
pressure cooker, as they get nice and moist-mushy that way.
Ray Grogan
2464 Halelaau Pl
Honolulu, HI 96816-3404
(808) 732-7476
A good book describing almost 100 taro varieties
is:
TARO VARIETIES IN HAWAII
LD Whitney, FAI Bowers, M Takahashi
1939
Hawaii Agricultural Experiment Station
Bulletin 84
(At UH Manoa, Hamilton Lib, Hawn S399 E2 no. 84)
About once every 6 months or so they "turn over"
the taro out at the UH ag station in Pearl City. They give a little talk on it, and if you help you can take home keikis to
start your own.

In 1997 I started spending lots of time in Iowa. Here is my first summer and
first attempt at growing taro there. There was a vacant lot next door, and the owner let me grow sweet corn, my taro, and
even mow out a baseball diamond.
On to contacts
|