Home | How to grow "wetland" taro in buckets | Critters | How to grow dryland taro | Indoor taro (winter in Iowa) | Harvesting, cooking, and eating taro | Taro varieties | Growing taro for corms | My favorite cycle in Hawaii, the "bunch" method | My favorite cycles in Iowa: Tidy Cats and bunches | Pictures of various ways to grow taro - landscape, shade, commercial, etc. | Dirt: how to mix and prepare in garden | Oldest (1997) version of how to grow and eat taro | Contact Me
Growing and cooking taro by Ray Grogan
How to grow "wetland" taro in buckets

picture of a taro plant growing in a trash can

picture of tiny taro plant in a gallon milk jug


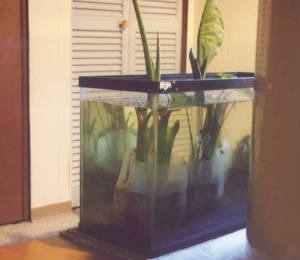
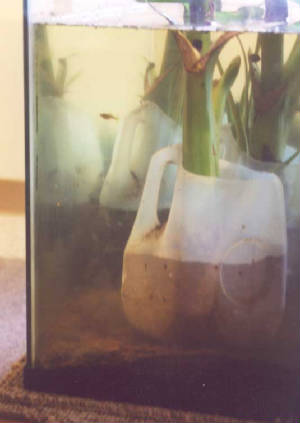
In the aquarium you can see how brand new plants look. In this case I am moving my Iowa plants indoors for the winter. As I harvested the outdoor garden, I saved a few young plants, and put them in dirt, and plopped them into the aquarium straight away. Note each plant has a stem or leaf above the water.


In a closeup of the aquarium you can hopefully see the little fish. If you do not have fish, you will probably grow mosquitoes.


Also note that the soil is not full. As the roots expand, they will need room. This also leaves room to add more dirt later, which is a way to keep the plant fresh without transplanting to bigger pot.


This is my most deluxe setup for growing taro in water. Our city (Honolulu) switched the trash system to special containers, so I got all the free trashcans I wanted. Inside the trashcan full of water is a 5-gallon bucket full of dirt and the taro plant. This setup is in the front yard, so I dressed it up a little with impatiens and other plants.


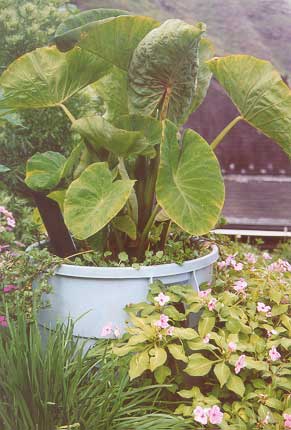
There are two main advantages to growing taro in water.  First, most weeds cannot live underwater like taro can. (The plants at the base of the taro are watercress, another water-loving plant.) Second, you don’t have to worry about watering. You can fill the water up weekly, or even monthly.


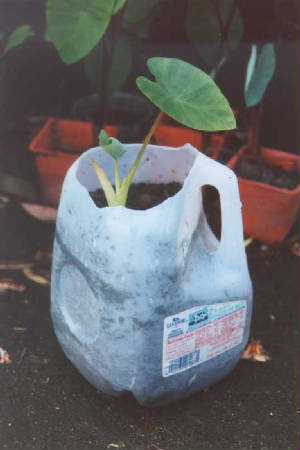
Far more common for me is using a milk jug. Milk jugs are very easy to move and work with.


My water spaces are limited, so generally I get the plants started like this, and let them grow “dry” (just water with the hose like any other plant) for a few months. Then when I harvest a plant, this one is ready to drop in. But you can also just go right into the water. The only critical thing is that the taro plant has something up in the air. Just a cut stem is enough.


taro plants in gal jugs set in aquarium water

aquarium closeup, shows fish, sandy soil in jug

taro-setup-new-gal-jugs-pond-7-01.jpg

OK, let’s get down to the details. This picture was staged to have all the parts in it just for you. In the background you see what will be the pond (the white plastic) is sitting on a bed of dirt (the weight of the water can occasionally poke a hole), and in turn, it has some dirt in it for the milk jugs to sit on.


Then in the foreground (well, mid-ground) we have a row of milk jugs. Starting on the left, first I cut the top off with the knife (foreground – that is my favorite knife – an Opinel #8). Then I poke holes on the bottom and sides. (Hmm, not very clear…. well – there are maybe 4 holes on each surface.) In this case I used the drill to make the holes. An easier way is to use an ice pick or awl and just stab away. Hole size fairly big (for big roots to grow out), but less than ¼” (so you don’t spill too much dirt).


Then we start planting. There is a scoop of my finest dirt. And a young taro “keiki” (Hawaiian for child – pronounced KAY-KEE). And a piece of PVC pipe, with 45° cuts. (The pipe is not critical, but it makes it easy to add fertilizer later, directly to soil instead of in the water. Nowadays I lean more towards just making the dirt fertile in the first place and not adding much fertilizer later.)

On to critters.